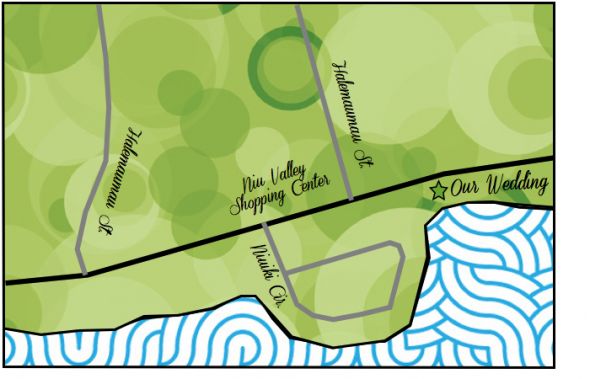
Mr. Koloa and I are getting married next year, but I am a crazy planner and also a spendthrift, so I've been trying to DIY lots of little things including invitations, favors, some guestbook stuff, etc. Anyways, I don't live near any of my family (my parents live on the mainland and my brother is stationed overseas) or any of my closest friends since moving to another island, so I don't really have anyone to share my excitement with over the smallest things I've been trying to do on my own--hence this post. I am hoping that other people who are DIYing things here can inspire me to do much more than the small things I've already done. Anyways, back to the title of this post: I made a map!
It all started pretty innocently. I teach and am on summer break and am completely bored out of my mind. Since break began, I have been doing several things to stay busy including reading, cutting things out of paper, browsing DIY blogs, etc. I began to think about our venue (which has changed islands and guestlist already within the past six months) and how it wasn't exactly easy to find, although it is right along the main road. It isn't in an area where most of the people we know would stop, because it is a private estate and we (or our friends) are not wealthy enough to just stop by those types of places.
Anywho, I decided I wanted to make a map to include with the invitation because I felt my invitation situation was pretty sparse to begin with. Simply stated, it is just an invitation. Nothing more, nothing less. No fancy RSVP postcard because I would prefer people to email or call. No menu choices because we can't afford a plated dinner and will be hosting a dinner buffet instead. Nothing. There's only so many times I can browse Pinterest:Weddings or Etsy:Weddings before becoming overwelmed with all the items that my invitation lacked such as pocketfolds, ribbon, or letterpress.
I decided I could solve this dilemna by including a map. After a quick google search I saw a little tutorial on Weddingbee here and decided that it seemed easy enough. However, I was going to be an innovator and use Apple's Pages to complete my map! In actuality it was not innovation but laziness, as I knew I wanted to print the maps out on the same size cardstock as the invitations and Pages already had the dimensions which saved me the trouble of walking the four steps to the table to measure the cardstock myself. Here is the final result!
If you are going to use pages like myself, you will have to march to a different beat (aka: follow different instructions) in order to accomplish this feat. If you haven't guessed by now, the whole purpose of this post is to have brides from all over the internet ooh and ahh at my remarkable DIY feat! Here are the steps I took below:
1) Type in the address of the venue into Google Maps. Print screen in order to save an image of the map (there might be another way to do this but I love print screening things) To print screen on a mac, you simply push command+shift+3 at the same time. It will save a picture of your screen to the desktop. I used a program called Paintbrush (free download here) to select the map only, copy, and paste it into Pages.
2) In Pages, you should use the Draw with Pen tool (Insert->Shape->Draw with Pen) to trace important things like roads or rivers or buildings or whatsohaveyou. You can use Inspector to change the color and thickness of the lines.
3) The most difficult part for me to figure out was how to make the land green and the ocean blue while staying in Pages. After drawing out the four roads and marking the wedding area with a star and using text boxes and the rotate function (also in Inspector) to place things where I wanted them, I deleted the image of the map in the back. I was left with a depressingly white background with four roads and a star.
4) There actually isn't a fourth step but I typed so much in step three I decided to break it up a bit. I used the Draw with Pen tool to outline the water first. Then, I went on the internet and searched "ocean pattern." I picked an image I liked and saved it to my desktop. Then I clicked the shape I made of the ocean and the bottom half of the rectangle, went to the Inspector, clicked on the Graphic tab, and under Fill, I selected Image Fill. The Inspector then had me upload a picture I wanted. The important things to do here now is underneath Image Fill another drop down menu will appear. You need to choose Scale to Fill, especially if your shape is NOT a rectangle. Then, back in Inspector under the Wrap tab, you need to select In Background.
5) Repeat step four for any other areas you want with a particular background. I used this for the land area after searching "green pattern."
Anyways, I hope you like it and I know it is simple. In Hawaii we really don't have many important roads so there is enough on the map for my guests to know where they are going. Please let me know if you need help making your own! I'm not sure if this things sends me an email whenever someone posts, but I sure hope so, so I can see what people think!
Sincerely,
Ms. Koloa

No comments:
Post a Comment